This post may contain affiliate links. Please read our disclosure policy.

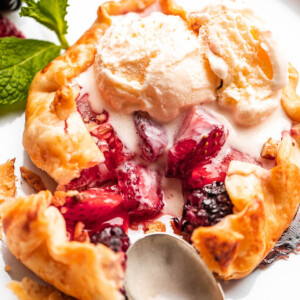
These Mini Berry Galettes are the perfect summer dessert. The sweet fresh berries are baked in a flaky pie crust that’s been dusted with sugar. They’re like pie, but easier and fun to make with kids!

Do you get excited for a gorgeous summery desserts just like I do? And what about if that dessert looks and tastes super impressive, but was completely simple to make? These mini pies are the answer!
Why You’ll Love This Berry Galette Recipe
- So easy. That’s what you’ve got here with these mini berry galettes. They are absolutely the prettiest little mini sweet treats and the perfect summer dessert – and you can make them with a 4 ingredient filling and frozen pie crust!
- Kid friendly. Not only do the kids love to eat these mini pies, they love to help make them. So grab the kids and get baking!
- Individually sized. Sometimes a piece of pie isn’t really what I want… There’s not always enough of that crisp crust! With these berry galettes, you get an entire freeform pie crust all to yourself!
Recipe Ingredients
- Mixed Berries: I used a combo of strawberries and blackberries, but any berries will be fine!
- Sugar
- Cornstarch
- Lemon Juice
- Refrigerated Pie Crusts: I use Pillsbury’s.
- Flour
- Milk
- Turbinado Sugar: This is optional for sprinkling over the pie crusts, but it’s a really nice addition!
- Vanilla Ice Cream: For serving!
How to Make Mini Berry Galettes
- Prep. Preheat the oven to 375˚F and line 2 baking sheets with parchment paper.
- Filling. Combine the berries, sugar, cornstarch, and lemon juice in a mixing bowl. Stir to combine and place the bowl in the fridge until you’re ready to use.


- Crust. Lightly dust your work area with flour and slightly roll out one of the pie crusts. Using the rim of a cereal bowl or a 5.5 to 6-inch round cookie cutter, cut out 4 circles from the rolled out pie crust. Repeat with the other pie crust. Transfer them to the prepared baking sheets.
- Form the galettes Divide the previously prepared berry filling evenly among the pies, placing the berries in the center of the dough. Fold the pie crust edges over the berries, overlapping the crust as you go. Make sure there aren’t any cracks or openings in the crusts or the fruit juices will seep out during baking.
- Top. Brush the tops of the pies with a bit of milk and sprinkle them with turbinado sugar.
- Chill. Chill the pies in the fridge for 15 minutes, and up to 5 hours.
- Bake. Bake the berry galettes for 25 minutes, or until they’re lightly browned and the berries are bubbling.
- Cool and serve. Remove them from the oven and cool them for 5 minutes. Top with vanilla ice cream and serve.
Tips for the Best Berry Galettes
- Change up the fruit.You can use this same technique and sub the berries for any season fruit (or frozen fruit, at that). These mini pies are great with everything!
- Sugar. If you can’t find or don’t have turbinado sugar, you can use sugar in the raw in its place.
- Don’t roll too thin. Be careful not to roll your dough too thin! This will create a soggy bottom.
- Filling consistency. Make sure your filling is not overly wet. The berries will release liquid as they bake so you don’t want to add excess moisture before the baking even begins.

How To Serve Mini Berry Galettes
For starters, you want to serve your galettes once they are starting to cool. It is tempting to serve them warm – the melty ice cream is irresistible! – but they also might start to fall apart.
I serve my berry galette topped with a scoop of vanilla ice cream or some whipped sweet cream! You could also sprinkle them with some cinnamon or top the ice cream with a drizzle of this homemade blueberry sauce. Another option is to top your galettes with chopped nuts.
How to Store Homemade Galettes
- You can store your homemade galettes at room temperature for up to 2 days. No need to refrigerate or freeze these little babies. But do make sure you cover them or place them in an airtight container.
Frequently Asked Questions
Galette is a French term for a flat, round, free form crusty cake. It’s a simple and rustic dessert that can be made with any fruit or pastry dough. Think of it a bit like a pie but with much less effort and fuss. It is just dough wrapped over fruit filling. That’s all. A simple, free form pie that’s quite literally bursting with sweet fresh fruit flavor.
Galettes are best served once they’ve cooled, so you can make them ahead of time if you are planning to bring them somewhere or just want to make dessert earlier in the day. I wouldn’t suggest making them more than a day in advance though, as the dough could become soggy on the bottom.
For my mini berry galettes, I used sliced strawberries and blackberries. You can use any berry you have though. Blueberries will work great and raspberries, too. You can use any combination of berries you’d like! Stone fruits are also a great choice.
More Easy Summer Desserts
Mini Berry Galettes
Ingredients
- 3 cups mixed berries, I used sliced strawberries and blackberries
- 2 tablespoons sugar
- 1 tablespoon cornstarch
- 1 teaspoon lemon juice
- 2 refrigerated pie crusts, I use Pillsbury’s, thawed and at room-temperature
- flour, for dusting
- milk, for brushing pie crusts, optional
- Turbinado sugar, for sprinkling over pie crusts, optional (IF using Turbinado sugar, make sure to brush the pie crusts with milk, first)
- Vanilla ice cream, for serving, optional
Instructions
- Preheat oven to 375˚F.
- Line 2 baking sheets with parchment paper and set aside.
- Combine berries, sugar, cornstarch, and lemon juice in a mixing bowl; stir to combine and place in the fridge until ready to use.
- Lightly dust work area with flour and slightly roll out one of the pie crusts.
- Using the rim of a cereal bowl or a 5.5 to 6-inch round cookie cutter, cut out 4 circles from the rolled out pie crust.
- Repeat with the other pie crust.
- Transfer mini pie crusts to previously prepared baking sheets.
- Divide previously prepared berry filling evenly among the pies, placing the berries in the center of the dough.
- Fold the pie crust edges over the berries, overlapping the crust as you go. Make sure there aren’t any cracks or openings in the crusts or the fruit juices will seep out during baking.
- Brush tops of pies with a bit of milk and sprinkle with turbinado sugar.
- Chill pies in the fridge for 15 minutes, and up to 5 hours.
- Bake for 25 minutes, or until lightly browned and berries are bubbling.
- Remove from oven and cool for 5 minutes.
- Top with vanilla ice cream and serve.
Nutrition
Nutritional info is an estimate and provided as courtesy. Values may vary according to the ingredients and tools used. Please use your preferred nutritional calculator for more detailed info.


I’m so impressed with how you take a simple ingredient list and transform it into a beautiful one of a kind pastry. Truly a work of art!
Thank you so much for your kind words!! I hope you enjoy these! 🙂
I made these the other day and my family loved them! They are so delicious and tasty!
I am very glad you and your family enjoyed them! Thank YOU! 🙂
Love this mini version! So perfect for summer parties!
I hope you enjoy it! Thank YOU! 🙂
What a beautiful pastry! Looking forward to enjoying this all summer long; looks amazing!
Thank you so much, Sara! I hope you enjoy it! 🙂
Mini galettes are perfect for serving individual desserts! These are gorgeous!
Thank you so much, Suzy! I hope you enjoy it! 🙂
So flavorful are these tarts. My family will love it!
Thank YOU! I hope you and your family will enjoy it! 🙂