No Knead Dutch Oven Bread
Mar 03, 2021
This post may contain affiliate links. Please read our disclosure policy.

My No Knead Dutch Oven Bread is the busy baker’s dream come true! You’ll get a warm artisan loaf with a crispy, crackly crust and hearty flavor without kneading! The best thing? It’s the easiest bread you’ll ever make!
Easiest Ever Homemade Bread
If you love homemade bread but don’t have the time to knead it, let it rise, punch it down, and let it rise a second time, I hear you. That kind of baking is best when you’re going to have plenty of flexibility and lots of me-time.
But this bread is different. No-knead bread is perfect for busy foodies! This special technique, using plenty of water and a long, slow rise, is super simple and forgiving.
Forget your dough? That’s fine! It can wait anywhere from 8 to 12 hours. Some cooks leave it even longer!
And to bake it, all you have to do is measure the correct amount, shape it roughly into a round, and plop it into a hot Dutch oven to bake. Anyone can do this, and the result is uber-delicious. I hope you will it a try!
What is a Dutch Oven & Why Use It?
A Dutch oven is a cast-iron pot, often coated in enamel for easier care. It has a heavy lid that fits well and traps steam inside the pot.
Dutch ovens are so useful for lots of dishes, but they really transform bread! When you preheat the pot, it helps to create a mini-oven within itself. Put dough in there and close the lid, and the bread immediately starts to form a lovely crust.
The trapped steam continuously wafts over the crust, allowing the bread to rise high. The outside of the bread gradually becomes firm, yet crispy at the same time. It makes a wonderfully crunchy artisan loaf.
Ingredients
One of the best things about dutch oven bread is that you only need a few pantry staples to create a hearty, delicious loaf. It’s just about the easiest recipe ever!
- Flour: You’ll need about 3 cups of your favorite all-purpose flour. I don’t recommend gluten-free flour, as gluten-free bread usually needs additional ingredients to make it stretchy and help it rise.
- Yeast: You’ll need one teaspoon of active dry yeast to make this bread.
- Salt: A teaspoon of salt is necessary to flavor the bread. Trust me, I left it out once by accident. Not tasty!
- Water: The dough needs to be soft and shaggy, so you’ll need 1 ½ cups of room temperature water (about 75˚F).
How to Make No Knead Dutch Oven Bread
Seriously, you guys, mixing up this dough takes no time at all! And, once the dough is made, you can let it hang out for ages, even overnight, before shaping and baking.
Make the Dough
Making this dough is so easy. All you have to do is throw it into a bowl and give it a mix!
- Combine Dry Ingredients: In a large mixing bowl, combine the flour, yeast and salt; whisk until well incorporated.
- Add Water: Using a wooden spoon or a dough whisk mixer, stir in the water; continue to stir until combined and dough is “shaggy.” If the dough is too wet and liquidy, add a little more flour, up to half a cup. The dough should be very soft but not runny like a batter.
Let It Rise
Rather than one or two short rises, no-knead bread only needs one long rise. That’s one thing that makes it ideal for busy people! You don’t have to babysit it; it’s just as convenient as any overnight recipe.
To let the dough rise, cover it with plastic wrap and let it rise in a cool spot for 8 hours, or until doubled. NOTE: You can also make my easy No-Knead Dough and refrigerate it overnight. Then, remove about 2 pounds of the dough to make this bread.
Bake the Bread
It can be a bit strange to work with no-knead dough, since it’s so soft, but don’t stress! This is a very forgiving recipe and it doesn’t have to be perfect (like, at all!).
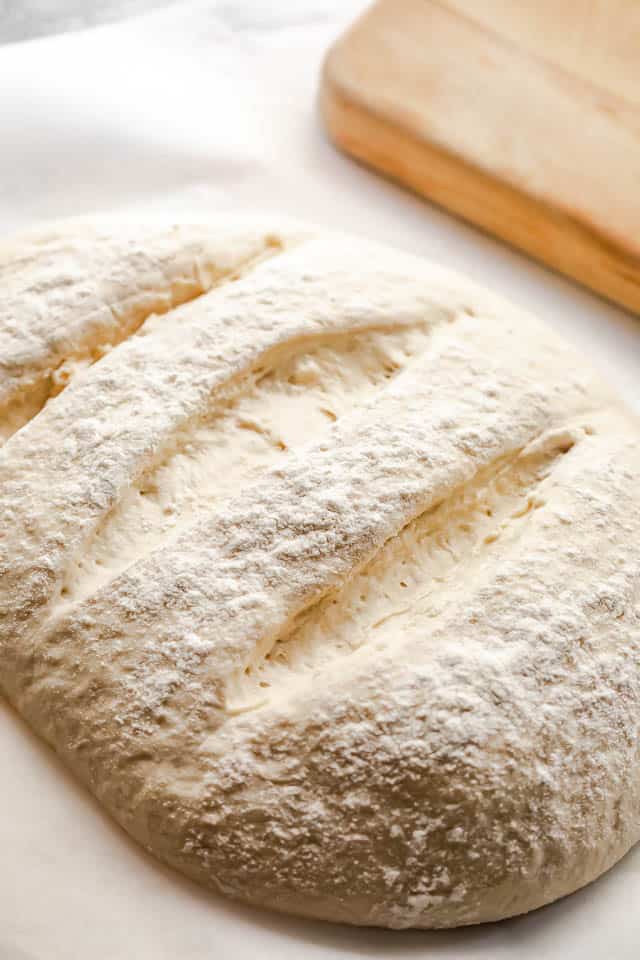
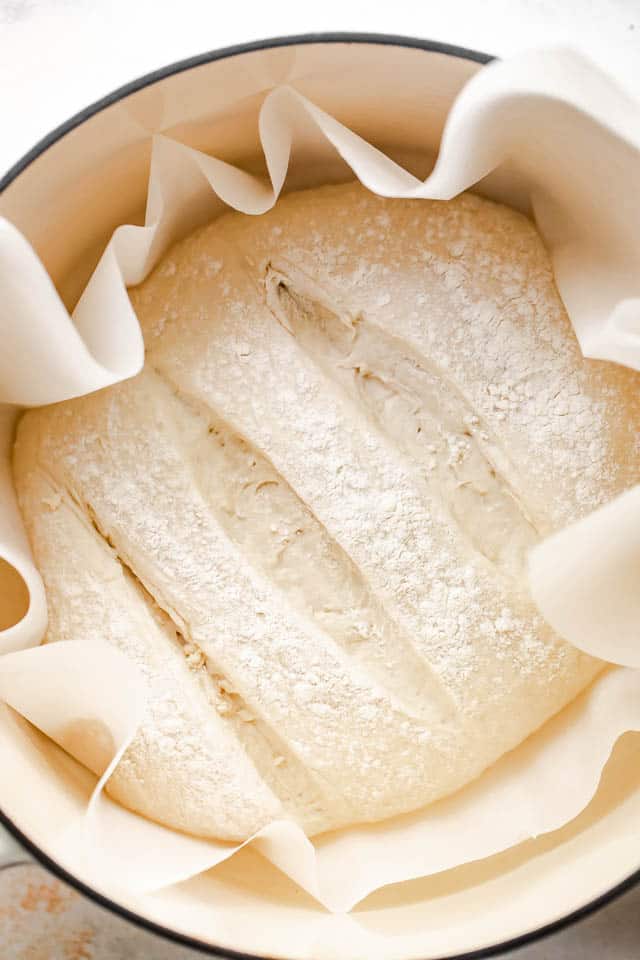
- Shape Dough: Flour your hands and sprinkle a little bit of flour on top of the dough; shape the dough into a round loaf as best as you can. If you have a metal scraper, you can use that to help shape the dough. Transfer the shaped loaf to a large piece of parchment paper.
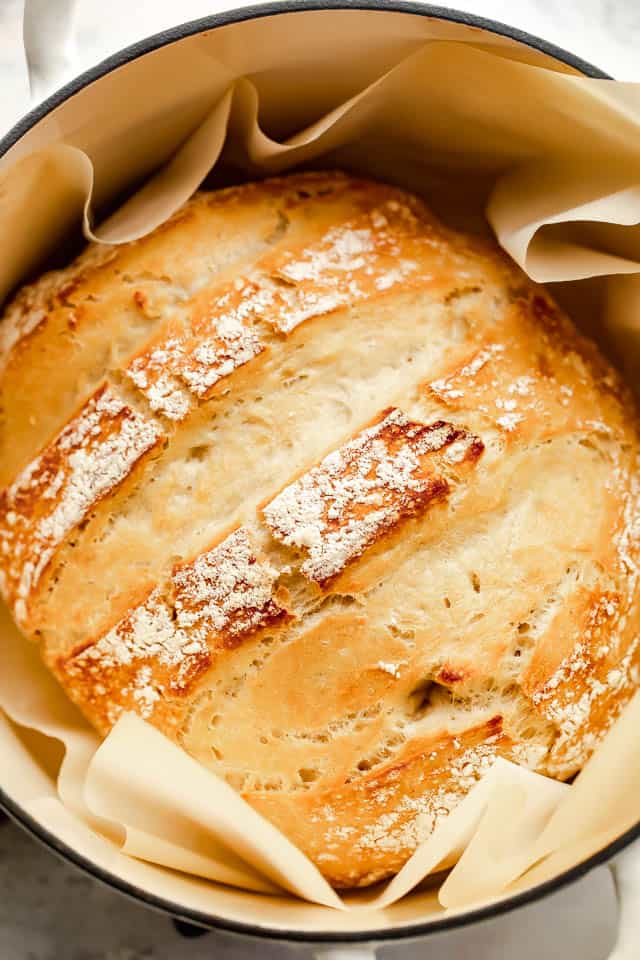
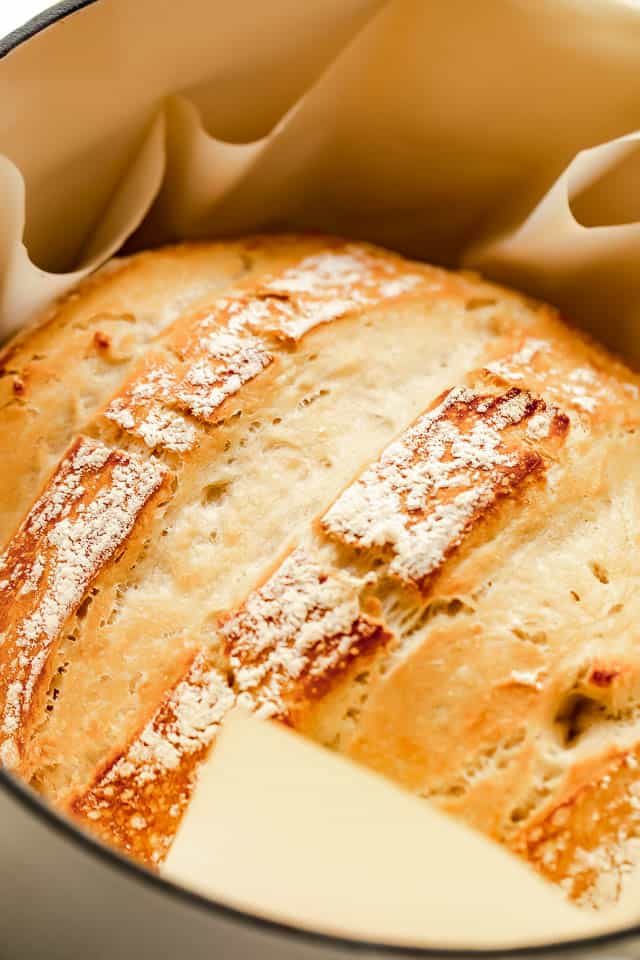
- Slash Dough & Place In Pot: Using a sharp knife, make a few slashes across the top of the loaf. Slashes should be about ¼-inch deep. Put on your oven mitts and take the Dutch oven out from the regular oven. Remove the lid. Holding onto the ends of the parchment paper, lift up the bread and lower it into the hot Dutch oven.
- Bake: Cover with the lid, and bake for 30 minutes. Remove the lid and continue to bake for 15 more minutes, or until golden brown on top.
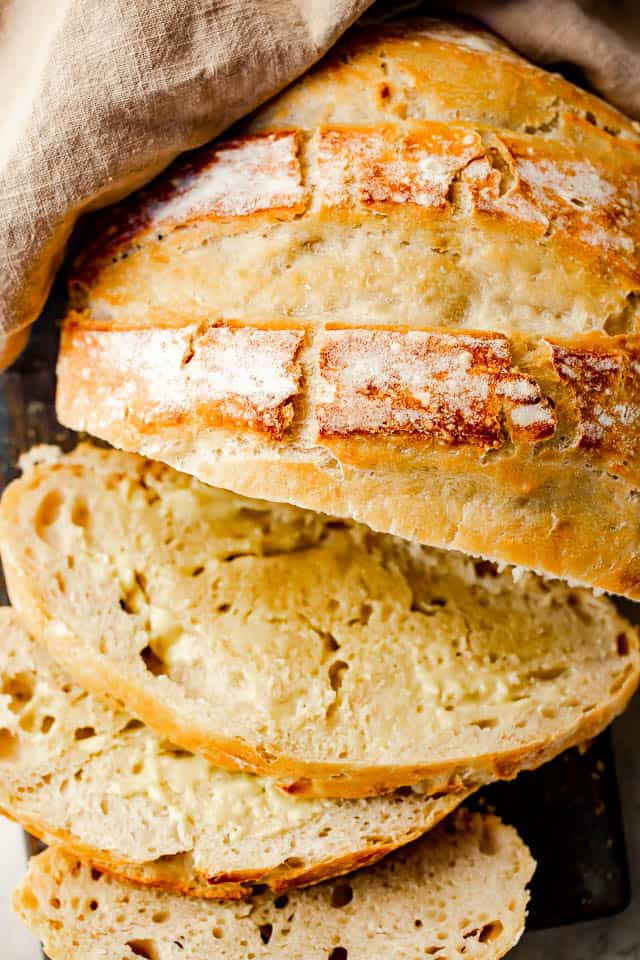
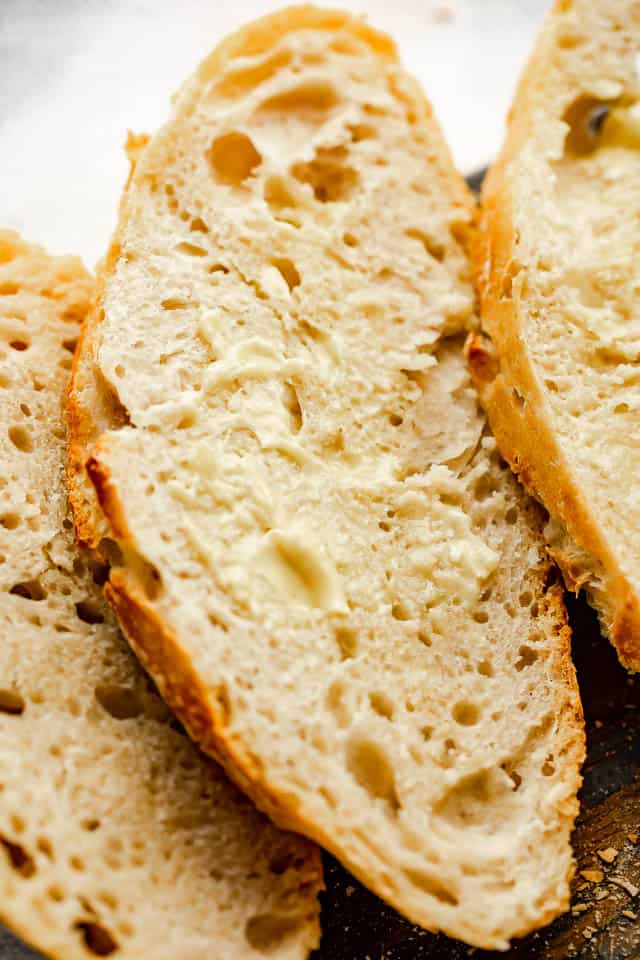
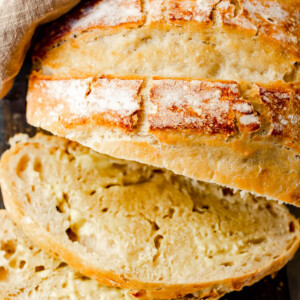
- Let Cool: Remove the finished loaf from the oven; transfer the loaf to a wire rack and let it completely cool. Cut and serve.
Tips for the Best Dutch Oven Bread
I doubt you’ll have any trouble throwing together this bread, but some extra tips never hurt anyone. Here are some suggestions to keep in mind:
- A Bench Scraper Is Your Friend: No-knead bread isn’t delicate, so it doesn’t matter if you handle it somewhat roughly. However, it can seem hard to manage, because it’s so soft and sticky. I’ve heard it described as “melted bubble gum!” So having a bench scraper to shape it and handle it is really helpful.
- Don’t Cut Bread Until Cooled: Before you slice up your freshly baked loaf, make sure it has cooled completely. If it’s still warm, you won’t get nice and clean slices.
- Make a Sandwich Loaf: If you pour the dough out onto a sheet of parchment, you can flatten it into a rectangle and use the parchment to help you “fold” it into thirds. Plop it into a greased loaf pan, and you can bake a sandwich loaf instead of a round loaf!
- Make Bread on the Grill: If you need or want to cook this without using your oven, you can fire up the grill instead! Just preheat your grill to 400˚F – 500˚F. Then heat up the Dutch oven on the grill with the lid closed. Add the dough to the hot pot, close the lid again, turn the heat down slightly, and “bake” until done.
Serving Suggestions
What can you do with a lovely, crusty loaf of homemade bread? Lots! The hearty flavor and texture go well with many different dishes. Here are a few ideas to get you started!
- Soup: Okay, you knew I was gonna say soup, didn’t you? It’s just such a good combination! I particularly like serving fresh bread alongside a big bowl of my Italian Sausage Butternut Squash Soup
- Beef Tips: I often serve Beef Tips in Mushroom Gravy with egg noodles or rice, but it’s also lovely with crusty bread, especially if you toast it! Add a simple salad, and you have a wonderful, comforting meal.
- One-Pot Meals: Dishes like my easy Smoked Sausage with Potatoes and Green Beans are complete meals, but because they’re usually on the liquidy side, they go really well with freshly baked bread! It’s a nice textural contrast and makes the meal extra filling.
How to Store Homemade Dutch Oven Bread
- Homemade no-knead bread stores best in a container that will allow it to “breathe” a little bit, while still keeping most of the air out.
- Most cooks recommend a paper bag, or a linen bread bag, or ceramic bread box. However you store it, this bread should be kept at room temperature and eaten, or frozen within two days after making.
Can I Freeze Bread?
- Yes, you can! To freeze homemade no-knead bread, first let it cool completely. Once it has cooled, wrap it well in two layers of plastic wrap, or a layer of plastic wrap and a layer of foil.
- Freeze for up to six months.
No Knead Dutch Oven Bread
Ingredients
- 3 cups all-purpose flour
- 1 teaspoon active dry yeast
- 1 teaspoon salt
- 1 ½ cups room temperature water,, about 75˚F
Instructions
- In a large mixing bowl combine flour, yeast, and salt; whisk until well incorporated.
- Using a wooden spoon or a dough whisk mixer, stir in the water; continue to stir until combined and dough is shaggy. IF the dough is too wet, add a little more flour, couple tablespoons at a time, and up to ½ cup more flour.
- Cover with plastic wrap and let rise in a cool spot for 8 hours, or until doubled.
- Preheat oven to 450˚F.
- Place a Dutch oven and its lid on the center rack of the oven and heat it for 30 minutes.
- In the meantime, turn dough out onto a floured surface.
- Flour your hands and sprinkle a little bit of flour on top of the dough; shape the dough into a round loaf. If you have a metal scraper, use that to shape the dough.
- Transfer shaped loaf to a large piece of parchment paper.
- Using a sharp knife, make a few slashes across the top of the loaf. Slashes should be about ¼-inch deep.
- Put on your oven mittens and remove the Pot from the oven. Remove the lid. Be careful – it's hot.
- Holding onto the ends of the parchment paper, lift up the bread and carefully lower it into the hot Dutch Oven.
- Cover with the lid and bake for 30 minutes.
- Remove the lid and continue to bake for 15 more minutes, or until golden brown on top.
- Remove from oven; transfer bread loaf to a wire rack and let completely cool.
- Cut and serve.
Equipment
Notes
Nutrition
Nutritional info is an estimate and provided as courtesy. Values may vary according to the ingredients and tools used. Please use your preferred nutritional calculator for more detailed info.
More Bread Recipes
Craving more hearty homemade bread recipes? These ones are extra delicious!


I am always worried to make bread, but since this was a no knead recipe, I was tempted to try it and I loved how it turned out!
That’s great! I’m very glad you enjoyed it! Thank YOU! 🙂
Such a gorgeous bread!! It turned out really good!
Thank YOU! I’m very glad you enjoyed it! 🙂
Oh my goodness! This bread look amazing! I can’t resist it!
Thank YOU! I hope you enjoy it! 🙂
This looks amazing and so delicious! My family is going to love this! So excited to give this a try!
Thank YOU! I hope you and your family enjoy it! 🙂
looks great but no dutch oven! could it be made in bread machine?
I have never prepared this bread in a bread machine so I don’t know the answer to that. Hopefully someone that has tried this in a bread machine will see your question and chime in.
Is the parchment paper supposed to hang over the edges of the pot or be tucked inside when lid is placed on?
Do you need to activate the yeast & then take a teaspoon or do you put it in dry?
Hi!
No, no need to activate it.
Horrible recipe. This was like a puddle of flour goo. Needed much more flour to become a bread! Zero stars. Please rate on actually making a recipe people, not how it looks! No one is going to post an ugly food picture on their blog. Horrible.
Exactly how much more flour did you need to add? This is a recipe that I use over and over again, at least once a month. The only thing I can agree with is that you MIGHT need to add more flour, up to maybe 1/4 cup, but nothing more than that, IF that. The recipe is not “horrible”, it’s actually quite delicious. Please google Jim Lahey’s bread making method and you’ll find this recipe used over and over again.