This post may contain affiliate links. Please read our disclosure policy.

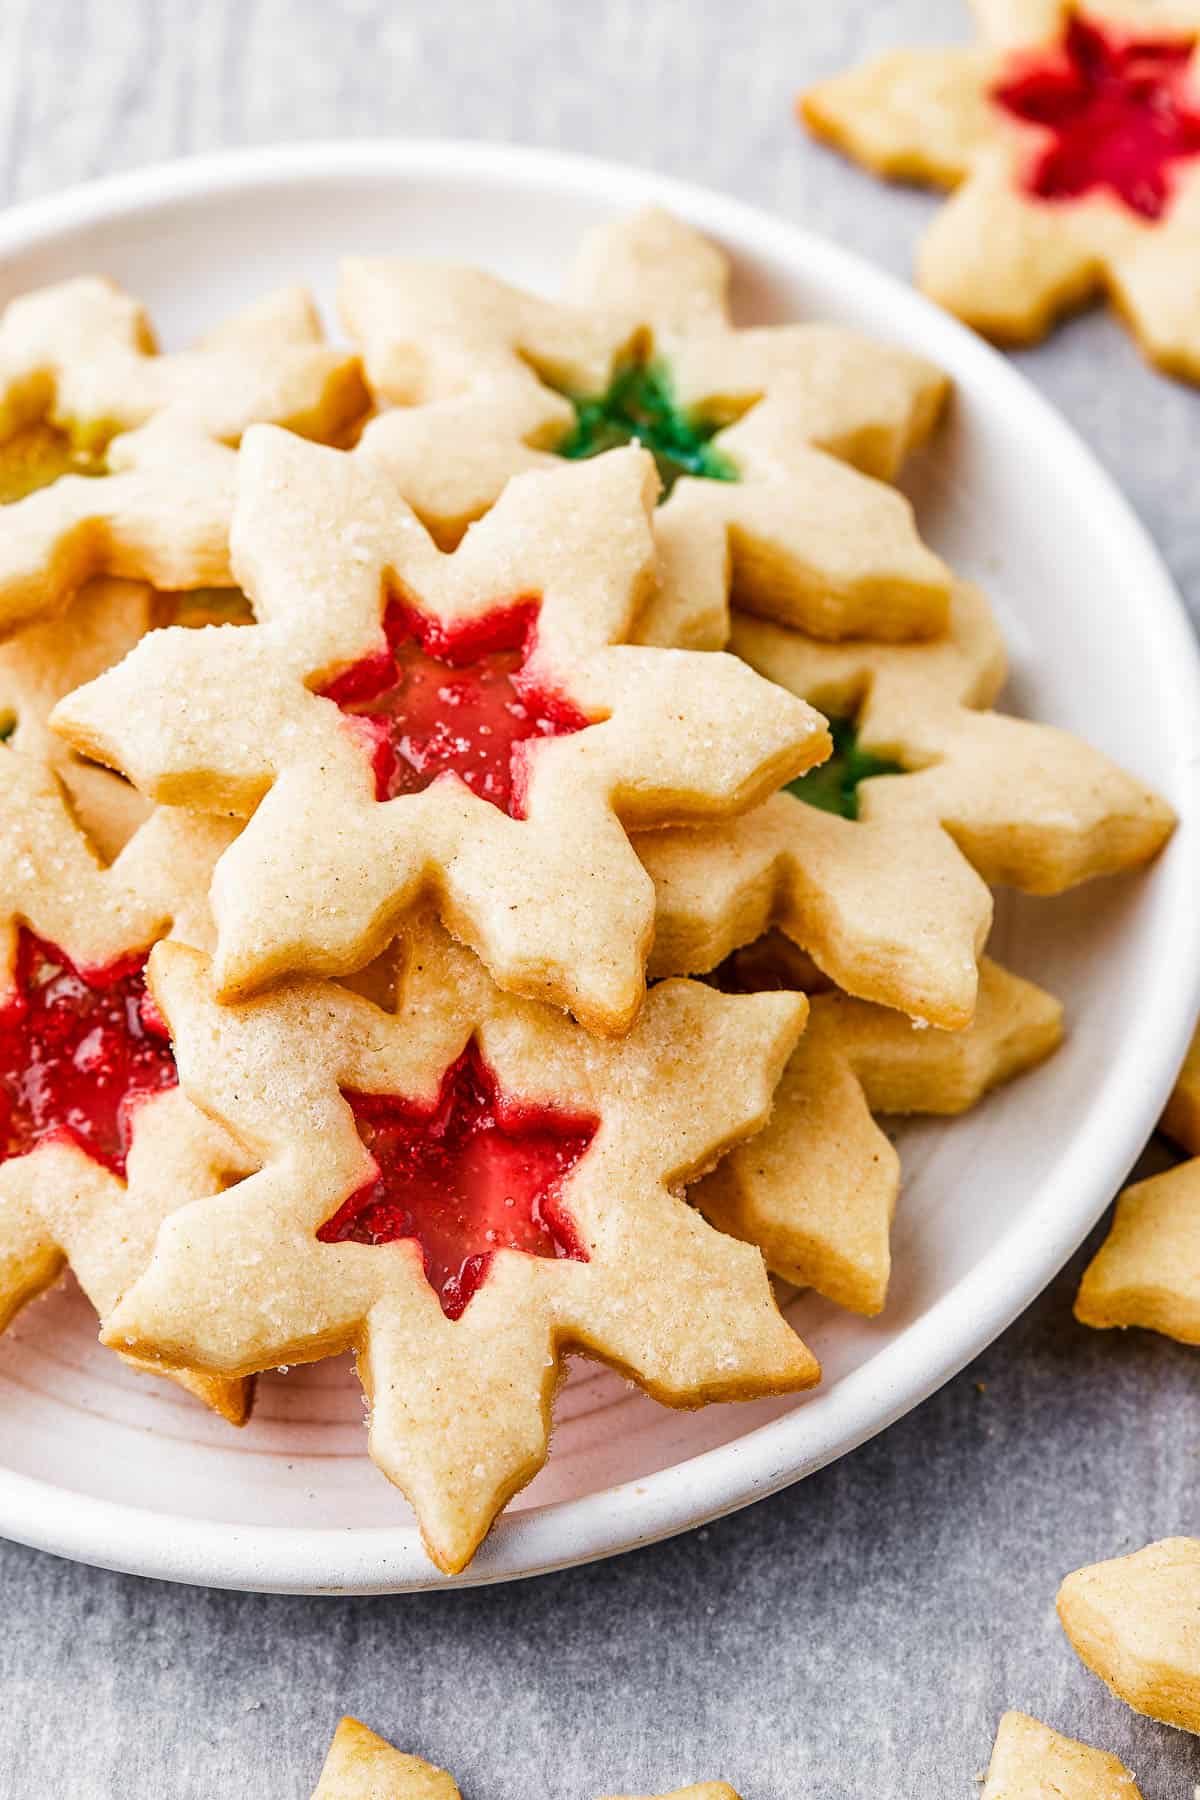
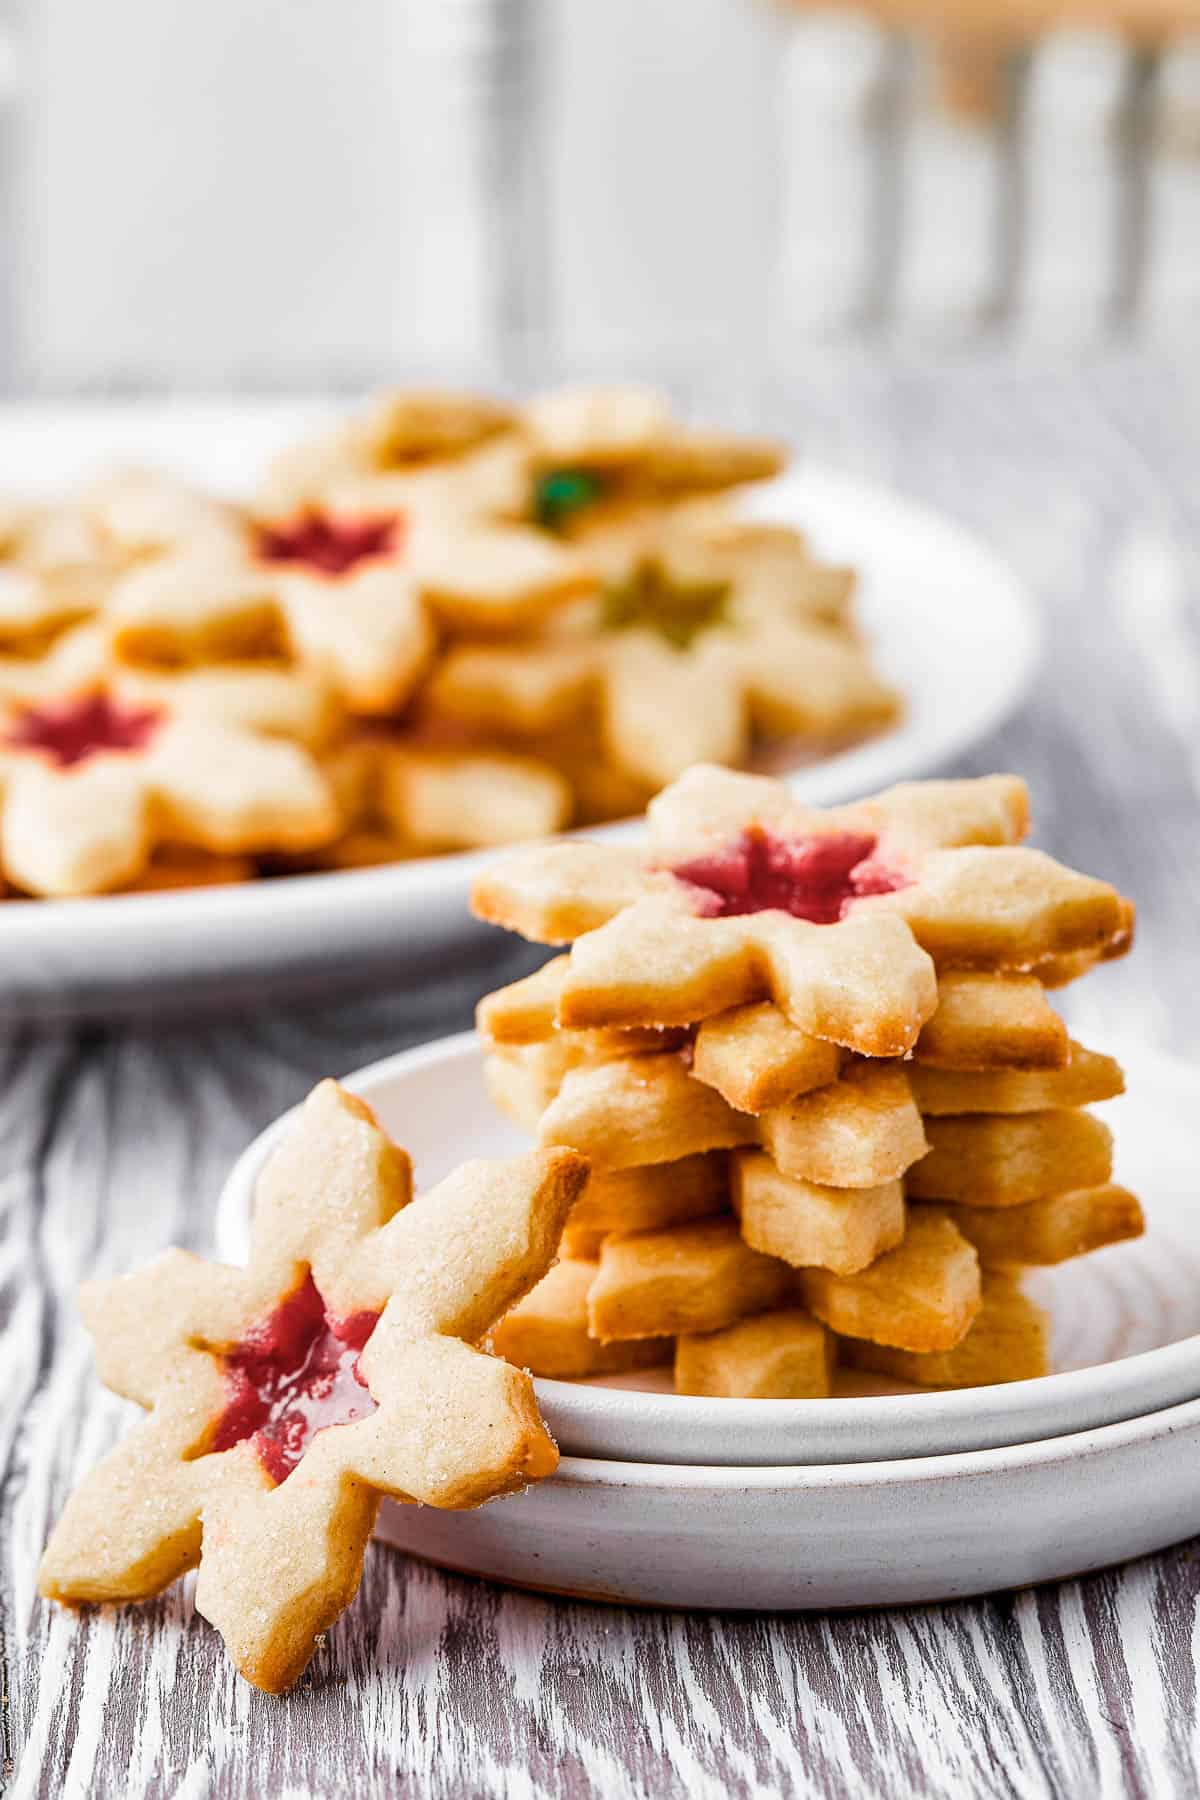
Need a showstopping Christmas cookie? These easy Stained Glass Cookies are a classic recipe made with buttery sugar cookie dough and crushed hard candy. You’ll love their gorgeous presentation and scrumptious taste!
Jump To
The Most Enchanting Cookie Recipe!
When it comes to Christmas cookies, there’s every reason to go all out! Of course, I am also a big fan of making things very easy – as a busy mom, time is a hot commodity around here! These beautiful stained glass cookies are the best of both worlds. They are simple to make, but so lovely to look at (and to eat!).
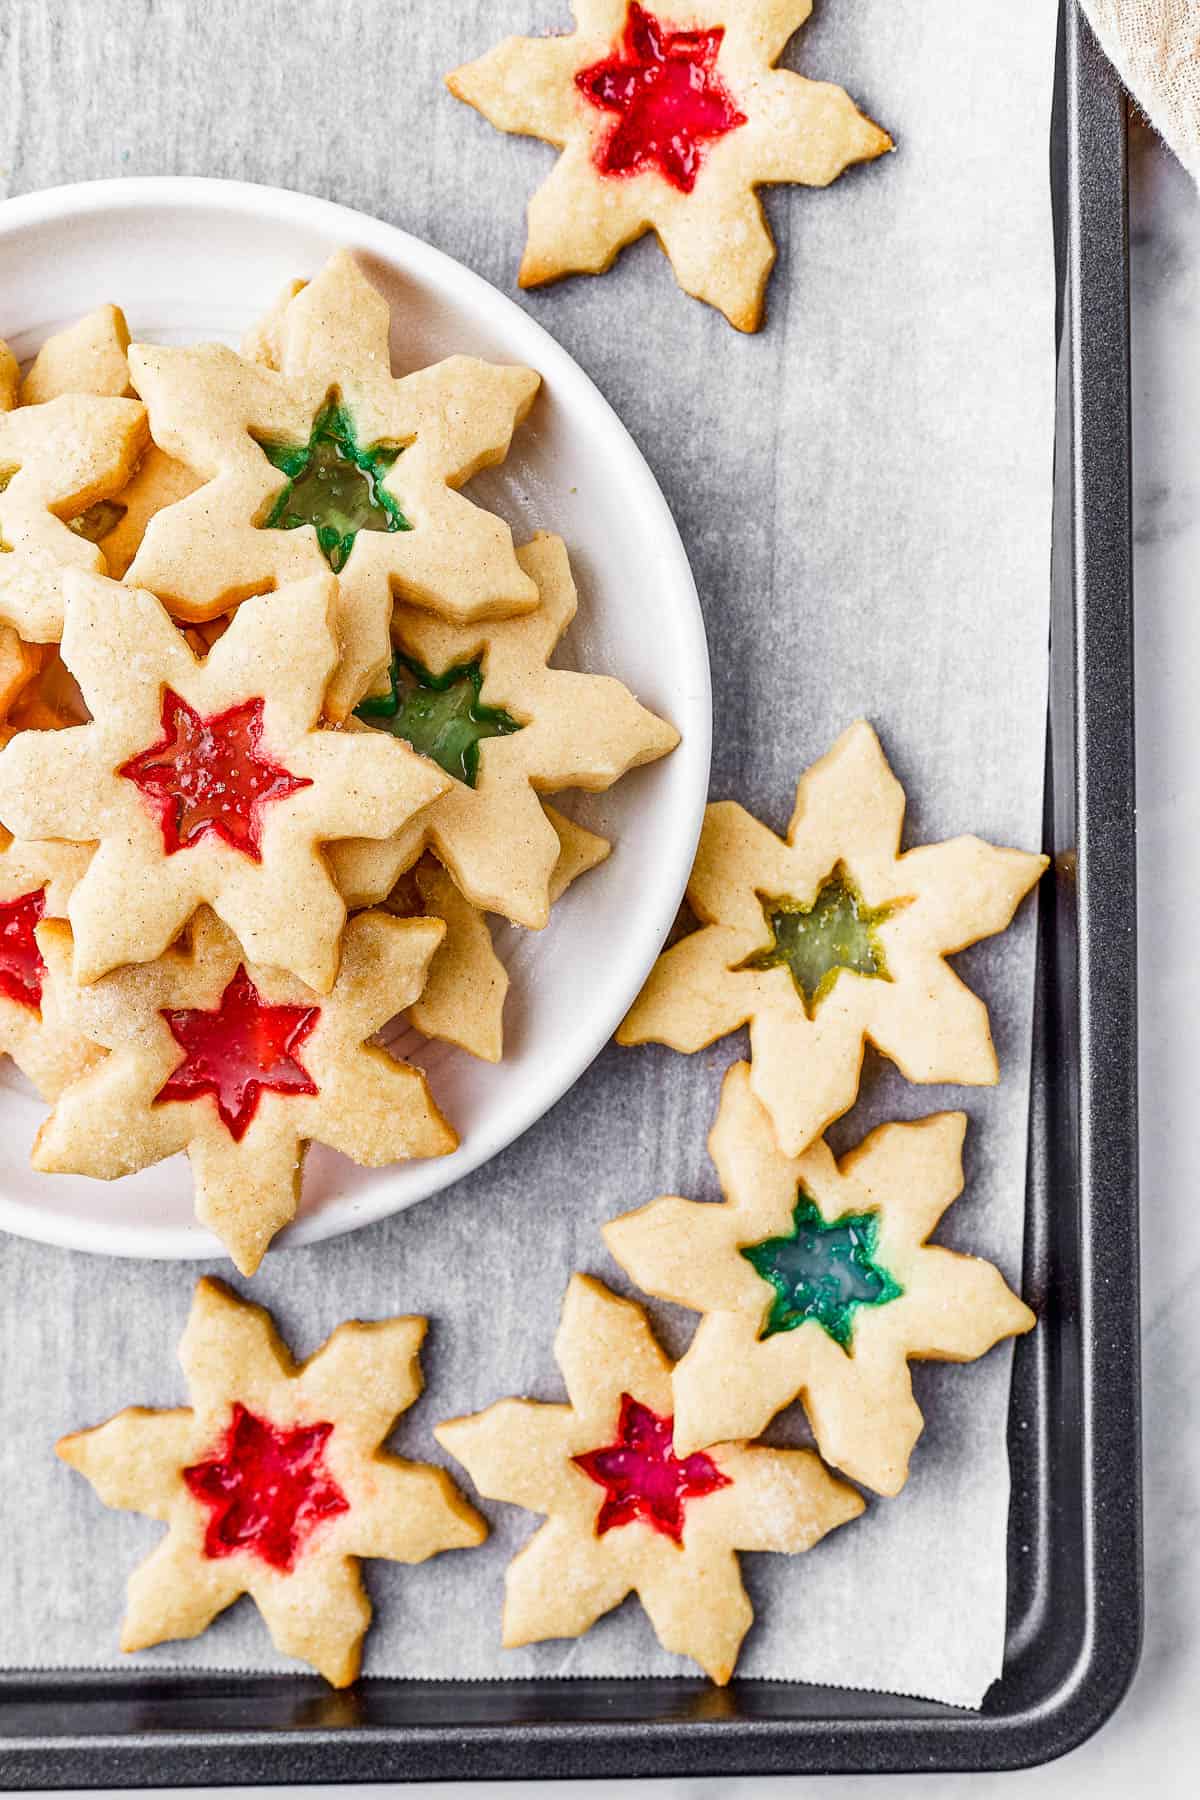
When you make and serve stained glass cookies, be prepared for “oohs” and “aahs!” Each golden-brown cookie is cut out with a shaped window in the center, and filled with a jewel-bright pane of melted hard candy. The hard candy is chewy to eat, melting in your mouth, and the cookies are a buttery cross between soft sugar cookies and crisp shortbread.
What Do I Need to Make Stained Glass Cookies?
The basic cookie dough here is more or less a sugar cookie dough, with a touch of almond extract and cinnamon to give it a more complex, Christmas-y taste to the cookie. You can use any colorful hard candies you like to make the windowpanes.
- Flour: You can use regular all-purpose flour, or substitute a gluten-free 1:1 all-purpose flour blend.
- Baking Powder: A bit of baking powder gives the dough lightness.
- Cinnamon: The cinnamon adds warmth to the cookie dough, but you can omit it if you’d rather have a more traditional sugar cookie taste.
- Salt
- Butter: I use unsalted butter in this recipe. It should be at room temperature.
- Sugar: You can use regular granulated sugar, or substitute raw sugar if you prefer.
- Egg: The egg should be at room temperature.
- Vanilla and Almond Extract: Pure extracts give the best results.
- Hard Candies: You’ll need a about ten colorful hard candies, such as Jolly Ranchers, to make the “stained glass” portion of the cookies.
- Egg White and Sprinkles: If you’d like to decorate the cookies with additional sparkle, you’ll need one egg white to brush onto the cookies, and white crystal sprinkles or coarse sugar for sprinkling. This is optional, though—the cookies are delicious with or without extra sprinkles.
The Best Hard Candies to Use
You can use just about any type of hard candy, even candy canes! Some give a brighter result than others, so it can be a matter of trial and error to get the colors you want, but in general, you can use what you want.
Keep in mind that candies which are not translucent will usually not give a true windowpane effect, but will remain opaque.
How to Make These Colorful Cookies
Let’s dig into the steps for making these gorgeous stained glass cookies at home! It’s a fun and artistic process, perfect for an afternoon of Christmas baking. Here’s how you do it!
- Sift the Dry Ingredients. In a large mixing bowl, sift together the flour, baking powder, cinnamon, and salt so there are no lumps and the ingredients are well combined. Then, set them aside while you work on the wet ingredients.
- Combine the Wet Ingredients in Stages. Using a stand mixer with the paddle attachment, cream together the butter and sugar until the mixture is light and fluffy. You may have to stop and scrape down the sides of the mixing bowl with a spatula now and then. Next, add the egg, vanilla extract, and almond extract. Turn the mixer to high speed, and mix until smooth.
- Combine the Wet and Dry Ingredients. Add the sifted dry ingredients to the butter mixture in the stand mixer bowl. Blend on low speed for a couple of minutes, until the dough is soft and smooth. If you find that the dough is too sticky to work with, add more flour in ½ tablespoon increments, mixing until smooth.
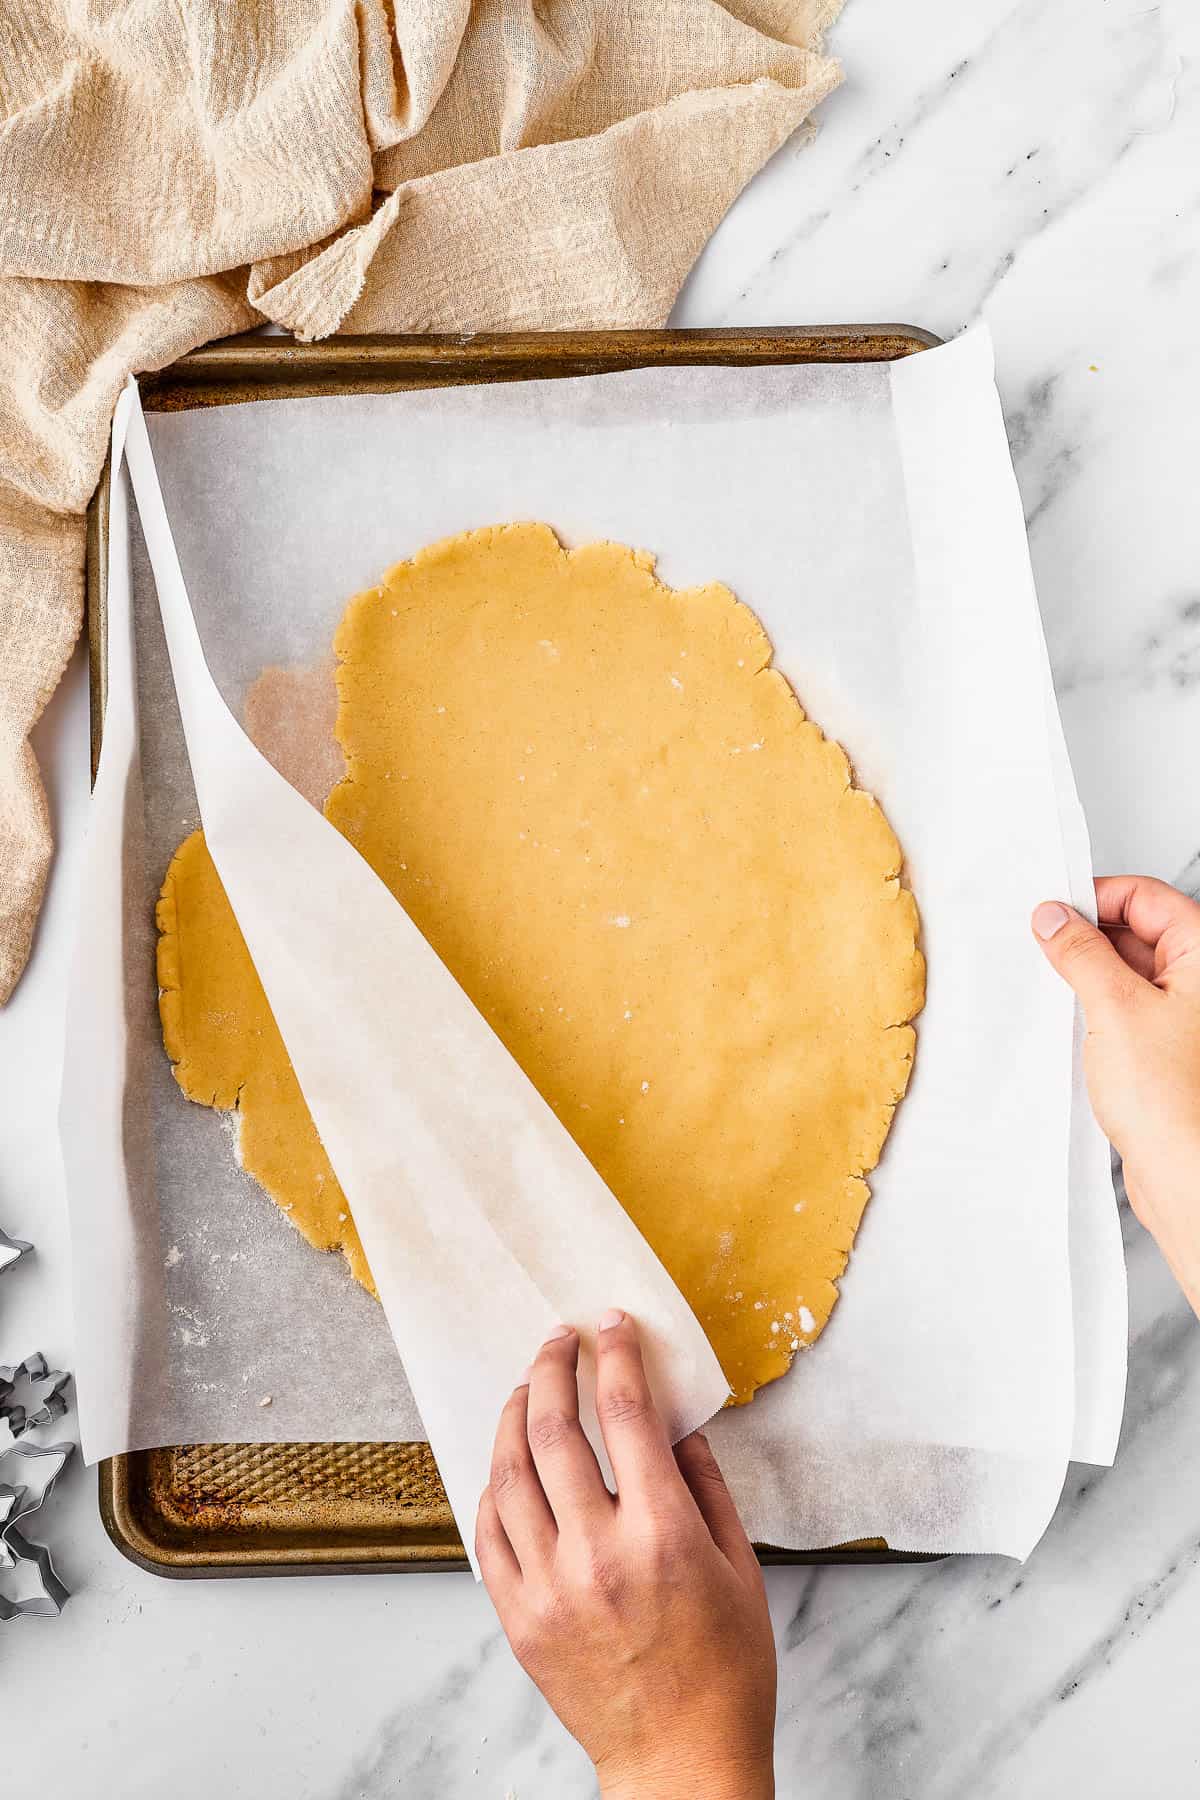
- Chill the Dough. Take the dough out of the mixer. Divide it in half, and roll each half out on its own sheet of parchment paper, to about ¼-inch thickness. Place each parchment sheet on a baking tray, and chill the trays for at least three hours, or overnight.
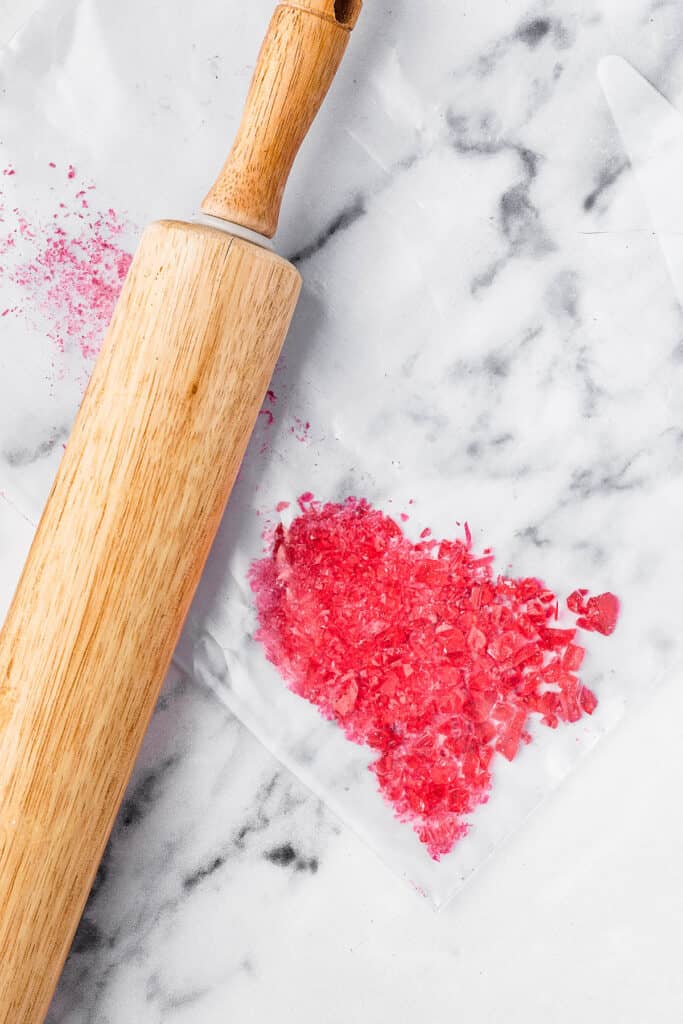
- Crush the Candies. When you’re almost ready to bake the cookies, crush up the candies. Separate them by color into separate baggies, and then use a meat mallet or the side of your rolling pin to crush them into small bits (but not powder).
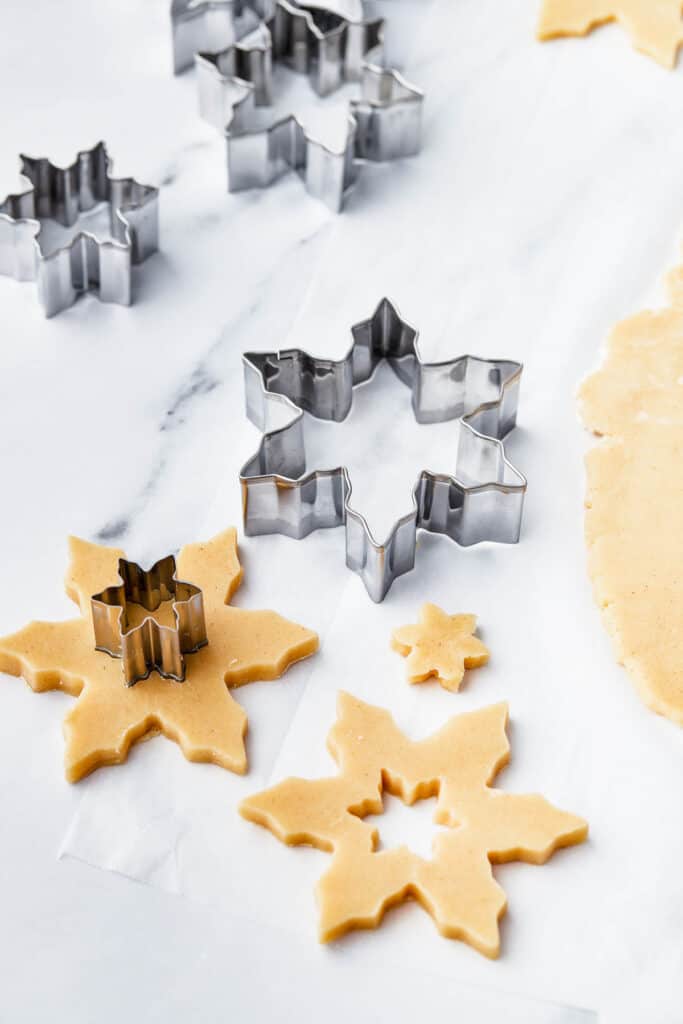
- Cut Out the Cookies. After the dough has chilled, set your oven to preheat to 375°F, and start cutting out your cookies. Use the large cookie cutter first, and then a smaller cookie cutter to cut out a “window” in each one. Place each cookie on a baking sheet lined with parchment. Then, combine all of the dough scraps into a ball, and re-roll the dough into a sheet. Continue cutting out more cookies, until you’ve used all of the dough. (Pro tip: if the dough becomes too soft or sticky to work with, just place it in the fridge for another 10 – 15 minutes or so, and then continue).
- Fill the Cookies. With the cookies arranged on cookie sheets, fill each “window” of the cookies with your crushed candies. They should be about 75% full. This is easiest to do using a small spoon.
- Optional: Add Sprinkles or Coarse Sugar. If you’re also decorating the cookies with crystal sprinkles or coarse sugar, brush each cookie with the whisked egg white, and sprinkle on the sprinkles or sugar.
- Bake and Cool. Bake the cookies for 8 to 10 minutes. They are done when the edges turn a light, golden brown. Take them out of the oven, and let them cool on the baking sheet for 10 minutes or so, until the candy centers are set. Then use a spatula to carefully pick them up off of the baking sheet, and transfer them to a cooling rack. Cool the cookies for another 5 minutes or so, and serve.

Top Tips for the Prettiest Cookies
The following helpful tips and tricks will help you ensure a perfect result. Stained glass cookies are knockouts, and so delicious!
- Cutting the Windows: To create the “window” in a cookie, you’ll need two cookie cutters of different sizes. If you don’t have two cookie cutters that are the right size, you can cut out of the middle of the cookies with a small, sharp knife.
- Filling the Windows: You only need to fill each cookie 75% full, as the candy will melt and spread into a thin layer. If you add too much candy, it will bubble and spread over the edges of the cookie.
- Chill Time: Chilling the dough is an important step, because without chilling, the cookie dough will spread during baking and lose its shape. So definitely factor in chilling time when you plan to make these!
My Favorite Variation Ideas
You can customize these easy cookies in a number of ways, mostly by changing up your cookie dough, or changing the candies. Here are a couple of my favorite variations!
- Cookie Dough Variations: You can make stained glass cookies with most sturdy cookie doughs, the kind that you roll and cut! In fact, this technique is often used to make fancy windows in gingerbread houses!
- Butterscotch Cookies: Try using crushed butterscotch hard candies for a sunny yellow window that has a sweet and buttery flavor.
- Cinnamon Sweetness: A little bit of cinnamon added to the cookie dough gives a warmer, slightly sweeter cookie.
- Just Vanilla: The almond extract gives a unique nutty flavor to the cookies, and elevates the flavor profile. However, if you prefer a more classic sugar cookie taste, omit the almond extract and use additional vanilla extract instead.

Can I Make Cookies in Advance?
You can definitely make these cookies ahead and store them until you’re ready to serve—check the section below for storage tips. However, you can also make the cookie dough ahead and freeze it in freezer bags for up to one month. Thaw in the fridge overnight, and you’re ready to roll it out and get baking!

How to Store Stained Glass Cookies
- Store cookies at room temperature for 5 – 7 days in airtight containers.
- You can also refrigerate the cookies in airtight containers or zip-top bags, for up to 10 days.
- To freeze stained glass cookie, stack cookies in airtight containers with wax paper or parchment between the layers to keep the cookies from sticking to each other. Freeze for up to three months.

Stained Glass Cookies
Ingredients
- 3 cups all-purpose flour
- ¾ teaspoon baking powder
- ½ teaspoon cinnamon
- ¼ teaspoon salt
- 1 cup unsalted butter,, room temperature
- 1 cup granulated sugar
- 1 large egg,, room temperature
- 1 teaspoon vanilla extract
- ½ teaspoon almond extract
- 8 to 10 colorful hard candies,, such as Jolly Ranchers
- 1 egg white,, whisked, for brushing onto the cookies (optional)
- White crystal sprinkles or coarse sugar,, optional
Instructions
- Sift the flour, baking powder, cinnamon, and salt into a large bowl. Set aside.
- In a stand mixer fitted with a paddle attachment, beat the butter and sugar together until light and fluffy, stopping and scraping the sides of the bowl as needed, about 3 minutes.
- Add egg, vanilla extract, and almond extract. Mix on high speed until fully incorporated, about 1 minute.
- Add the sifted dry ingredients to the mixer, and mix on low speed until combined, about 2 to 3 minutes. The dough should be soft, but not sticky or unmanageable. If the dough is too sticky to roll, add more flour in ½ tablespoon increments.
- Remove the dough from the mixer, and divide it into two equal portions. On a piece of lightly-floured parchment paper, roll out one portion of the dough to ¼-inch thickness. Transfer both the parchment and dough to a large baking tray. Repeat with the remaining dough. Place both trays of rolled dough in the refrigerator, and chill at least three hours, or overnight.
- While the dough is chilling, prepare the candies. Separate them by color, and place them into plastic bags. Roughly crush them into small (not powdery or fine) crystals, with a meat mallet or the side of your rolling pin.
- After the dough has chilled, preheat the oven to 375˚F degrees and begin cutting the cookies. First, cut out a cookie with the larger cookie cutter. Then, cut out the center of the cookie using a smaller cookie cutter, to create a window. Re-roll the dough and continue cutting cookies until you have used all of the dough. If the dough becomes too soft or sticky, roll it and place it in the refrigerator to chill for 10 to 15 minutes.
- Carefully transfer the cookies to a baking sheet lined with parchment, paper, keeping them about 2 to 3 inches apart.
- Using a small spoon, fill the centers of the cookies with crushed candy, about 75% full.
- Brush the tops of the cookies with whisked egg white, and sprinkle with white crystal sprinkles or coarse sugar (if using).
- Bake for 8 to 10 minutes, or until the edges turn a light golden brown.
- Remove the cookies from the oven, and let cool on the baking sheet for 10 to 15 minutes, or until the candy centers have set.
- Once the cookies have cooled, use a spatula to carefully remove them from the baking sheet, and transfer them to a cooling rack. Cool for another 5 minutes, and serve.
Nutrition
Nutritional info is an estimate and provided as courtesy. Values may vary according to the ingredients and tools used. Please use your preferred nutritional calculator for more detailed info.