This post may contain affiliate links. Please read our disclosure policy.

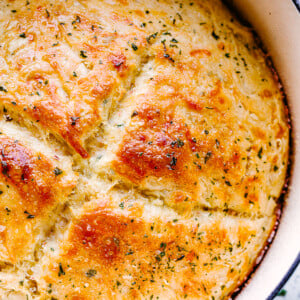
Making warm and crusty homemade bread is easier than you’d imagine with this no knead skillet cheese bread. Perfect for dunking in warm soup, the cheese and parsley add extra yummy goodness!
For those who love bread-making, you’ll also want to try my popular flatbread recipe or this creamy spoon bread! I’m confident that both will be your new favorites!

Why I Love No Knead Bread
- Easy. If you’ve ever felt intimidated by the idea of making your own artisan bread, this is the bread to try. You don’t need a fancy bread maker or any tools other than a mixing bowl, wooden spoon, and a skillet.
- Cheesy. If you are a cheese lover, you will completely fall in love with this homemade bread. It’s cheesy, savory, and 100% satisfying.
- The crust. This cheese bread recipe has the perfect consistency, including a golden and crisp crust with a tender interior.
- Fresh. There’s something special about homemade bread just out of the oven. It’s fresh and fills your entire house with that delicious bakery smell.
What is No Knead Bread?
No knead bread is a simple bread-making method that requires no kneading. The dough is mixed and allowed to rise slowly, relying on time rather than kneading to develop gluten. This results in bread with a hearty crust and soft interior, and it’s perfect for those who want homemade bread with minimal effort.
Recipe Ingredients
- Luke Warm Water: Activates the yeast.
- Active Dry Yeast: Causes the dough to rise.
- Salt: Enhances flavor.
- All-Purpose Flour: For this recipe, I use a little over 4 cups of flour.
- Garlic Powder: Adds a savory, garlicky flavor.
- Onion Powder: Provides a subtle onion taste.
- Shredded Cheddar Cheese: Adds a rich, cheesy flavor and texture. Other melting cheeses like mozzarella or gouda can be substituted.
- Olive Oil: Used to coat the skillet and the dough, adding flavor and a crispy crust.
- Coarse Salt: Sprinkled on top for extra flavor and texture. Flaky sea salt is a good substitute.
- Dried Parsley: Used as a topping for additional flavor and visual appeal. Other herbs can also be used.
How to Make No Knead Cheese Bread


- Make the dough. Combine your water and yeast in a large mixing bowl. Add a cup of flour and salt and stir it all together. Stir in the garlic powder, onion powder, and cheese. Gradually add the remaining flour and stir everything until it is all well combined.
- Rise. Cover the bowl with plastic wrap and let your dough rise for 1 hour.
- Prepare. Grab a cast iron skillet and coat the bottom and sides with olive oil. Lightly flour your hands and transfer the dough to the skillet. Shape the dough into a round disk, cover it with a towel, and let it stand for 30 minutes.
- Preheat. While the dough rests, preheat your oven to 400˚F.
- Bake. Drizzle 1 tablespoon olive oil over the top of the dough and sprinkle it with salt and parsley. Score the top of the loaf with a knife in a criss-cross pattern. Bake it for 30 minutes or until the top is a golden brown.
- Cool and Serve. Remove the cheese bread from the oven and immediately turn it out onto a cooling rack. Let it completely cool. Then, cut it and serve it with this butternut squash soup or a side of beer battered chicken!
Recipe Tips
- Cool it on a wire rack. To keep this skillet bread from getting soggy, remove it from the skillet as soon as you pull it out of the oven and transfer it to a wire rack.
- Skillet options. You do not need a skillet to make this bread. I know, it’s in the recipe title – but trust me, here. If you do not have a cast iron skillet, simply use a round stoneware baking dish instead!
- Use good cheddar. For better flavor, opt for a better quality cheddar cheese. You can even shred the cheese yourself.
- Double the recipe. You can double this cheese bread recipe, but don’t forget you’ll also need a bigger skillet. I recommend a 12-inch skillet for a double batch.

Serving Suggestions
Obviously, this no knead cheese bread goes great with a bowl of our creamy ravioli soup and a side of a salmon blt salad. It’s also great with hearty beef Guinness stew and pot roast. But don’t count it out on the side of a pasta dish, either. This chicken bacon ranch pasta or my creamy seafood pasta is fantastic. Basically, anything that is saucy is a perfect match for this bread.
How to Store Leftovers
The bread can be stored in a zip-top bag in a cool, dry place for up to 3 days. It can also be frozen for about 3 months.
More Homemade Bread Recipes
No Knead Cheese Bread
Ingredients
- 2 cups luke warm water
- 2¼ teaspoons active dry yeast
- ½ teaspoon salt
- 4⅓ cups all purpose flour
- 1½ teaspoons garlic powder
- ½ teaspoon onion powder
- 1 cup shredded cheddar cheese
- 2 tablespoons olive oil, divided
- course salt
- dried parsley
Instructions
- Combine water and yeast in a large mixing bowl.
- Add 1 cup flour and ½ teaspoon salt to the yeast mixture; stir with a wooden spoon until combined. Stir in the garlic powder, onion powder, and cheese.
- Add remaining flour, one cup at a time, stirring until well combined. Cover the bowl with plastic wrap and let it rise for 1 hour.
- In the meantime, add 1 tablespoon of olive oil to an 8-inch cast iron skillet and coat the bottom and sides of the skillet with the oil.
- Lightly flour your hands and transfer the dough to the skillet. Shape the dough into a round disk; cover with a towel and let it stand for 30 minutes.
- Preheat the oven to 400˚F.
- Drizzle 1 tablespoon of olive oil over the top of the dough and sprinkle it with salt and parsley. Then, score the top of the loaf with a knife.
- Bake for 30 minutes or until the top is golden brown.
- Remove the bread from the oven and immediately turn it out onto a cooling rack.
- Let it completely cool before cutting into it.
Notes
- To freeze the dough: Make the dough as instructed and let it rise for 1 hour, per the recipe. Once risen, form the dough into a ball, wrap it in plastic wrap, and then place it in a freezer-friendly container and keep it frozen for up to a month. When ready, thaw the frozen dough on the kitchen counter, let it rise, and bake as directed.
Nutrition
Nutritional info is an estimate and provided as courtesy. Values may vary according to the ingredients and tools used. Please use your preferred nutritional calculator for more detailed info.


Can I use bread flour instead of all purpose flour for this?
Let me just first say that I have not tested this recipe with bread flour.
Having said that, technically, you could use bread flour, but bread flour is stronger than all-purpose flour. Its higher protein content could result in a drier dough, so you may need to add more liquid.
Is this recipe correct? 2 C water, 4 1/3 C flour?
When I make sourdough I use a little less water and 6-7 C flour.
Yes, the recipe is correct.
This really turned out pretty good! The ONLY thing keeping it from 5 stars is the lack of salt. I didn’t believe the other commenters, but they’re right. Even with coarse salt, the recipe needs more. I sliced the bread in the middle, and I added butter (and salt). I told the girls that this would probably be perfect for BLT’s.
I have never made bread before. This no knead bread was easy, fun and delicious. I make it often and is always delicious. Thank you so much for this recipe. It’s a winner.
That’s great! I’m very glad you enjoyed it! Thank you so much! 🙂
SUPER EASY and tailorable recipe. I cooked the bread in a pottery loaf pan…..PERFECTION. I opted for a variety of cheeses but stuck to fresh parsley. Next time, same cheese profile and rosemary…mmmmm.
Thank you for an EASY AND DELICIOUS RECIPE.
I’m very glad you enjoyed it! Thank YOU! 🙂
So it’s only good for 3 days?
Yes, homemade bread is good for about 3 to 4 days, depending on the temperature (about 68˚F to 70˚F is ideal) and humidity, but if you keep it in the fridge, it may last couple days longer. I would suggest to just keep it tightly sealed and avoid storing bread in damp and airy locations.
Great recipe! Easy to follow instructions, especially for first time bread makers! I have made this a few times. The one thing I changed was the salt half teaspoon is just not enough 1 full teaspoon definitely brought out more flavor. And 4 cups and a little dash of flour is prefect. If wanting a plain bread stick to the recipe. Double up on the spices for a better flavor. I used Everything seasoning as my topper. This recipe is definitely a go to!!!
Thank YOU! I’m very glad you enjoyed it! 🙂
The bread turned out perfectly in taste and appearance. I used an 8” cast iron skillet, but it was too small and the bread overflowed the sides. Even though I used a tablespoon of olive oil in the skillet, it still stick to the bottom and was difficult to get out. I would suggest using parchment paper with whatever pan you use. I will definitely make this again with these adjustments.
I’m very glad you enjoyed it! Thank YOU! 🙂
This was really good but how would you suggest reheating the bread since I would like to serve it warm?
Very easy and it tastes wonderful!
Thank YOU! I’m very glad you enjoyed it! 🙂