Chicken Kiev
May 09, 2023, Updated Feb 14, 2026
This post may contain affiliate links. Please read our disclosure policy.

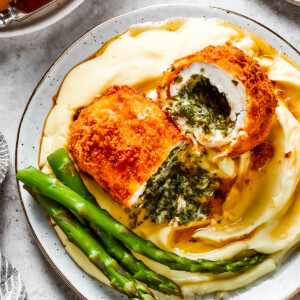
What could be better than tender, juicy chicken stuffed with melting herb butter? This easy Chicken Kiev recipe is perfectly crispy, flavorful, and festive.

Why I Love Chicken Kiev
- Rich and Flavorful Taste: Chicken Kiev offers a delicious bite with its combination of crispy, breaded chicken filled with rich and flavorful garlic-herb butter.
- Classic and Timeless: With its long history and recurring popularity, this dish has proven to be a timeless dish, loved across generations and cultures.
- Easy to Make: Despite its seemingly complex layers of flavor and texture, chicken Kyiv involves a few steps that require chilling the ingredients, but it’s a manageable cooking experience for both novice and experienced cooks.
Chicken Cordon Bleu vs Chicken Kiev?
Both of these recipes are made with chicken breasts and a crispy breadcrumb coating. The difference is the filling: chicken cordon bleu has a ham and cheese filling, while chicken Kiev is made with a simple garlic-butter filling that makes the meat extra juicy and tender.
The Ingredients You’ll Need
If you want to make homemade chicken Kiev, you will need ingredients for the breaded chicken, and for the buttery filling.


- Butter: Set the butter out ahead of time, to soften up a bit.
- Garlic: Fresh garlic cloves, minced or pressed with a garlic press.
- Herbs: Chopped fresh parsley and thyme.
- Salt: To taste.
- Chicken Breasts: You will need boneless, skinless chicken breasts for this recipe.
- Seasonings: Salt and pepper.
- Flour: All-purpose flour is fine.
- Eggs: Beat the eggs lightly, for dipping the chicken.
- Breadcrumbs: Use your favorite breadcrumbs. Panko crumbs are extra-crispy, so I often use those.
- Vegetable Oil: For frying.
Tips for Success
- No Leaks: To make sure that the butter doesn’t leak out during the cooking process, make sure to cover it completely with the chicken breast and then freeze until all of the “seams” are frozen together.
- Deep Frying Alternate: If you’ve ever made my chicken and waffles or a simple fried chicken sandwich, you know that deep frying can be a bit messy. To reduce the amount of oil, shallow-fry the chicken pieces in a heavy skillet, turning them to brown evenly on all sides
- Doneness: To make sure your chicken is cooked correctly, use a meat thermometer. Thoroughly cooked chicken should register at 165°F.

Serving Suggestions
- Potatoes. Since that melty garlic butter is going to be running out onto your plate, make sure it runs over these classic creamy mashed potatoes.
- Vegetables. These easy roasted vegetables will quickly be a go-to side dish once you try them! Or my roasted asparagus.
- Salad. You could also try this cucumber salad with sour cream dressing, a fabulous and simple recipe.
Chicken Kiev
Ingredients
For The Compound Butter
- 6 tablespoons unsalted butter, softened
- 4 cloves garlic, minced
- 2 tablespoon chopped fresh parsley
- 1 tablespoon chopped fresh thyme
- salt, to taste
For The Chicken
- 4 boneless skinless chicken breasts
- 2 teaspoons salt
- ½ teaspoon fresh ground black pepper
For The Breading
- 1 cup all-purpose flour
- ½ teaspoon salt
- 3 eggs, beaten
- 1½ cups plain breadcrumbs
- 2 cups vegetable oil, or as needed, for frying
Instructions
For The Compound Butter
- Combine the ingredients. In a small bowl, combine the butter, garlic, parsley, thyme, and salt to taste. Mix with a fork until well blended.
- Shape and freeze. Place the butter mixture onto a piece of plastic wrap and roll it into a log shape. Put it in the freezer for 30 to 40 minutes until firm and ready to slice.
For The Chicken
- Prep the chicken breasts. Place each chicken breast onto your work surface and slice it horizontally, without cutting all the way through. Open the chicken breasts like a book and lay them flat.
- Pound the chicken and season it. Put the chicken breast between two pieces of parchment paper or plastic wrap, and pound with a meat mallet to flatten. Season both sides with salt and pepper.
- Add the compound butter. Cut the frozen garlic butter log into four equal pieces. Place one piece of the frozen garlic butter in the center of each chicken breast, and fold the chicken over the butter, gathering the sides to form a round ball or a log.
- Partially freeze the chicken. Wrap each chicken piece in plastic wrap and twist the ends tightly. Place the wrapped chicken pieces in the freezer for about 1 hour, or until the seams have frozen (this helps the chicken hold its shape and not leak the butter filling during cooking.
For The Breading and Frying.
- Prep. Preheat your oven to 400°F and set out a 9×13 baking dish. Heat the vegetable oil in a large saucepan or Dutch oven to 350°F.
- Set out three shallow bowls for the breading. Place flour and 1/2 teaspoon salt in one bowl, the beaten eggs in another, and the breadcrumbs in the third bowl.
- Bread the chicken. Unwrap the chicken breasts and discard the plastic wrap. Roll each chicken piece in flour, then in the egg, and finally in the breadcrumbs, making sure to coat them evenly.
- Fry. Deep fry each chicken piece for 2 to 3 minutes, or until golden brown on all sides. Transfer all the fried chicken pieces to the baking dish.
- Bake. Transfer the baking dish to the oven and bake the chicken for 15 to 20 minutes, or until the internal temperature reaches 165˚F. Cooking time will depend on the thickness of the chicken.
- Rest and serve. Remove your chicken Kiev from the oven and transfer to a plate or cutting board; let it rest for 5 to 8 minutes before serving.
Notes
- Chicken Breasts: This recipe requires boneless, skinless chicken breasts.
- Softened Butter: Pull the butter out of the fridge for about 20 to 30 minutes before you start working with it.
- Breadcrumbs: Use your favorite plain breadcrumbs, but you can also use Panko crumbs.
- Leftover Chicken Kiev can stay in the fridge for about three to four days, stored in an airtight container. To reheat, place the chicken in an ovenproof dish and reheat it at 350°F for 10 to 12 minutes or until hot.
- You can make this ahead by preparing the Chicken Kiev pieces and freezing them before you cook them. That way, they’ll be freshly cooked just before serving instead of just reheated. To freeze, place the formed, uncooked chicken Kiev pieces in the freezer to firm. Then, transfer the frozen pieces into airtight containers or freezer bags for long-term storage. Use them within three months.
Nutrition
Nutritional info is an estimate and provided as courtesy. Values may vary according to the ingredients and tools used. Please use your preferred nutritional calculator for more detailed info.
How to Make Chicken Kiev
This dish is made in several stages. Both the garlic butter and the chicken have to be chilled at different points, so be sure to read over the recipe a couple of times before you get started and budget the right amount of time.


- Make The Garlic Herb Butter: Mix all ingredients in a bowl, form into a log on plastic wrap, and freeze for 30 minutes.
- Butterfly The Chicken: Slice chicken breasts horizontally to open like a book.
- Pound The Chicken: Place butterflied chicken between plastic wrap, pound to even thickness, season with salt and pepper.
- Assemble The Chicken Kiev: Slice frozen butter into four pieces, place one in each chicken breast, and fold over.
- Freeze The Chicken: Freeze chicken rolls for an hour.
- Bread It: Unwrap frozen chicken, coat in flour, egg, and breadcrumbs.
- Fry It: Heat oil to 350°F, fry chicken until golden brown.
- Bake: Preheat oven to 400°F, transfer fried chicken to baking dish, bake for 15-20 minutes.

How to Store and Reheat Leftovers
- Leftover chicken Kiev can stay in the fridge for about three to four days, stored in an airtight container. You can reheat it in an ovenproof dish at 350°F for 10 to 12 minutes or until hot.
- To freeze, place the formed, uncooked chicken Kiev pieces in the freezer to firm, but then transfer the frozen pieces into airtight containers or freezer bags for long-term storage. Use them within three months.


This recipe is so good! It’s better than an kiev I’ve ever ordered (and I’ve ordered a lot).
I’m very glad you enjoyed it! Thank YOU! 🙂
This looks fantastic and I cannot wait to make this for my family!
Thank YOU! I hope you and your family enjoy it! 🙂
I’ve tried this Chicken Kiev and I loved it! I am so glad to make it at home with your recipe!
That’s great! I’m very glad you enjoyed it! Thank YOU! 🙂
Such an amazing meal!! My family loved this! It quickly became a new favorite meal at my house!
That’s great! I am very glad you and your family enjoyed it! Thank YOU! 🙂
This is definitely making me drool right now!
Thank YOU! I hope you love it! 🙂